

After 90 days of vacancy, you'll need to inspect far more than cosmetic condition. Start outside by checking for damaged siding, clogged gutters, and compromised entry points. Inside, prioritize leak detection, plumbing functionality, and HVAC systems that have been sitting idle. Inspect every room for moisture, mold, and pest activity. Vacant properties deteriorate in ways occupied ones don't, and knowing exactly what to look for will help you protect your investment.
Key Takeaways
- Inspect the exterior perimeter for damaged siding, clogged gutters, standing water, overgrown vegetation, and signs of pest intrusion.
- Check all plumbing by running faucets and flushing toilets to detect leaks, slow flow, or unpleasant odors.
- Examine ceilings, walls, and under sinks for water stains, discoloration, or warping indicating hidden moisture damage.
- Test HVAC systems by cycling through heating and cooling modes while replacing filters and listening for irregular sounds.
- Document all findings with photos and a detailed repair log, prioritizing habitability issues like mold, leaks, and broken appliances.
Why 90 Days Changes What You're Looking For
When a unit sits vacant for more than 90 days, the inspection shifts from a standard turnover walkthrough to something more deliberate.
You're no longer just checking for tenant damage or cleaning needs. You're looking for what the building itself has been doing without anyone inside.
Unoccupied properties deteriorate in specific ways. Without regular use, plumbing seals dry out, ventilation stagnates, and small moisture issues escalate into mold growth.
Pest infestations take hold when there's no daily activity to disrupt them. Minor problems that a tenant would've noticed and reported go undetected.
The 90-day mark matters because that's when passive neglect compounds.
Your inspection needs to account for what time and inactivity have caused, not just what the last occupant left behind. Regular septic system maintenance can also help mitigate potential issues during vacancies.
Start Outside: Exterior and Entry Point Checks
Before stepping inside, walk the full perimeter of the property. Ninety days of vacancy creates real exposure, and exterior maintenance issues compound quickly when no one's watching.
Look for damaged siding, clogged gutters, standing water, overgrown vegetation pressing against the structure, and signs of pest intrusion like burrowing near the foundation or chewed wood.
Pay close attention to entryway security at every access point—front door, back door, side gates, and garage entries.
Check that locks haven't seized or been tampered with, hinges are intact, and door frames show no signs of forced entry or weather damage.
Confirm all exterior lighting still functions. Regular property inspections are essential for maintaining tenant safety, so addressing these exterior concerns can prevent larger issues inside.
What you find outside often signals what's waiting for you once you step through the door.
Water Damage, Leaks, and Plumbing That Sat Too Long
Once you're inside, water damage and plumbing issues should be your first priority. Stagnant plumbing, undetected drips, and poor moisture control can cause serious structural damage over 90+ days. Conduct a thorough leak detection sweep before anything else.
Check these areas carefully:
- Under sinks and around toilets for staining, warping, or soft flooring
- Ceilings and walls for discoloration, bubbling paint, or water rings
- The water heater for corrosion, sediment buildup, or pooling at the base
- Supply lines and shut-off valves for mineral deposits or slow seeping
- The basement or crawl space for standing water, efflorescence, or mold growth
Run every faucet, flush every toilet, and inspect each drain for slow flow or foul odors indicating stagnation. Additionally, be mindful that older buildings often lack modern insulation, which can exacerbate water damage issues.
HVAC, Electrical, and Systems That Need a Restart
With plumbing and moisture checked off, shift your attention to the mechanical and electrical systems. Extended vacancy puts stress on equipment that wasn't designed to sit idle.
Start with your HVAC—replace HVAC filters, cycle the system through heating and cooling modes, and listen for irregular sounds that signal a problem. Check vents for blockages and confirm the thermostat responds correctly. Regular maintenance can enhance efficiency and prevent unexpected breakdowns.
Move to electrical next. Test every circuit, inspect electrical outlets for discoloration or loose fittings, and reset any tripped breakers.
Check smoke and carbon monoxide detectors and replace batteries if needed.
Don't overlook the water heater, sump pump, or any smart home devices. Systems that sat dormant need a full functional test before a tenant moves in.
Inside Room by Room: What Vacant Rentals Hide
Once you've confirmed your systems are operational, it's time to move through the interior space by space.
Kitchens and bathrooms carry the highest risk for water damage, mold, and fixture failures, while bedrooms and closets often hide issues with ventilation, flooring, and storage that tenants left behind.
Living areas and entryways round out the interior walkthrough, revealing wear patterns, damage to surfaces, and safety concerns that only become visible once the property sits empty.
Kitchen and Bath Risks
Kitchens and bathrooms are the two rooms that cause the most expensive surprises in a vacant rental. Stagnant water, dried-out seals, and untested kitchen appliances and bathroom fixtures can turn a routine inspection into a costly repair list.
Check both rooms methodically before assuming anything works.
Look for these common issues:
- Faucets and supply lines that have corroded, cracked, or developed slow leaks
- P-traps that have dried out, allowing sewer gas to enter the unit
- Kitchen appliances that fail to power on, cycle correctly, or seal properly
- Bathroom fixtures showing mineral buildup, cracked caulk, or compromised grout
- Under-sink cabinetry with water staining, warping, or mold growth
Document everything before testing any system under full pressure.
Bedroom and Closet Concerns
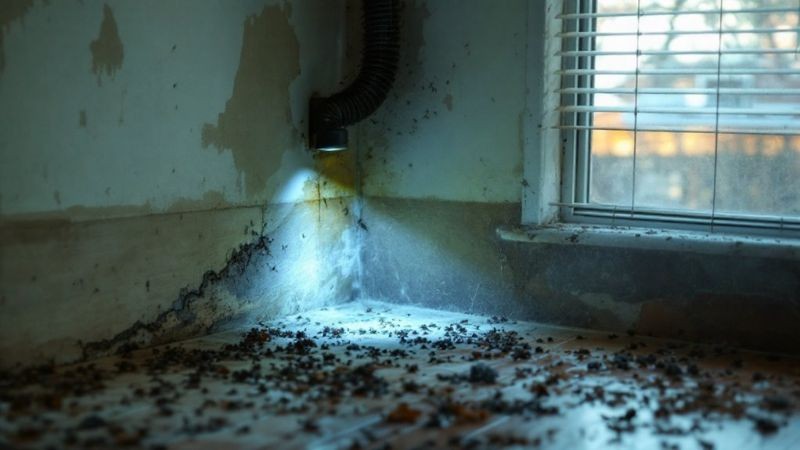
Bedrooms and closets tend to get glossed over during a vacant property inspection, but they're where hidden moisture damage, pest activity, and deferred wear quietly accumulate.
Check window seals and sills for condensation staining, which signals mold growth behind walls or inside framing. Open every closet and inspect corners, baseboards, and upper shelves—darkness and poor airflow make these prime zones for mold growth and pest infestations to take hold undetected.
Look for droppings, chewed materials, or nesting debris that confirm active pest infestations.
Test closet doors for sticking or misalignment, which can indicate structural shifting or moisture swelling. Inspect flooring near exterior walls for soft spots, discoloration, or warping that vacancy and seasonal changes tend to accelerate.
Living Areas and Entryways
Living areas and entryways take the most foot traffic of any space in a rental, and vacancy doesn't erase that wear—it just stops masking it.
Walk each space methodically, using a lighting assessment to reveal what casual glances miss.
Check for:
- Flooring damage – scuffs, soft spots, or lifting edges hidden by previous furniture arrangement
- Wall and baseboard condition – dents, holes, or paint separation near high-contact zones
- Entry door hardware – sticking locks, misaligned frames, or worn weatherstripping
- Light fixtures and switches – flickering, non-functional bulbs, or loose cover plates
- Ceiling and corners – staining, cracking, or early signs of moisture intrusion
Document everything before scheduling repairs.
Vacancy reveals the truth—your inspection captures it.
What to Fix Before the Next Tenant Moves In
Once the inspection is complete, you'll have a clear picture of what needs attention before the next tenant moves in. Use your findings to build a prioritized maintenance checklist, separating urgent repairs from cosmetic updates.
Address safety issues first—faulty wiring, plumbing leaks, HVAC problems, and compromised locks. These aren't optional.
Next, tackle anything that affects habitability: water damage, mold, pest evidence, or broken appliances.
Once critical repairs are done, shift focus to cosmetic work like fresh paint, patched walls, and deep cleaning. A well-executed tenant turnover protects your property's value and sets the right tone for the next tenancy.
Document every repair with photos and receipts. That record supports future inspections, warranty claims, and any security deposit disputes that may arise. Additionally, ensure to conduct regular inspections as part of your ongoing maintenance strategy to proactively address potential issues.
Frequently Asked Questions
Should I Hire a Professional Inspector or Do This Myself?
You can handle DIY inspections for basic walkthroughs, but hire a professional for systems like electrical, plumbing, and HVAC. Weigh cost considerations carefully—a professional's fee often prevents expensive oversights down the line.
Does Vacancy Affect My Landlord Insurance Coverage or Claims?
Yes, vacancy can impact your coverage. Most landlord insurance policies limit protection after 30-60 days vacant, potentially voiding insurance claims. You'll want to notify your insurer immediately to explore vacancy endorsements or specialized coverage.
How Do I Document the Inspection for Legal Protection?
Use a dated inspection checklist with photos, written notes, and your signature. These legal records protect you in disputes, insurance claims, or court by providing clear, timestamped evidence of your property's condition.
Can I Charge a Previous Tenant for Vacancy-Related Damage?
You can charge a previous tenant for damage assessment costs if your documentation proves tenant responsibilities caused the damage. Compare move-out records to current findings and consult local laws before deducting from their security deposit.
How Long Does a Full Vacancy Inspection Typically Take?
A full vacancy inspection typically takes 2–4 hours, depending on your property's size and condition. Working through a thorough vacancy checklist helps you manage inspection duration efficiently, ensuring you don't overlook critical systems or structural concerns.
Conclusion
A vacant property doesn't wait for you to catch up — problems compound quietly while the unit sits empty. Once you've worked through every inspection point on this list, you'll know exactly what needs attention before your next tenant moves in. Address issues now, document everything, and you'll protect your investment, meet your legal obligations, and start the new tenancy on solid footing.